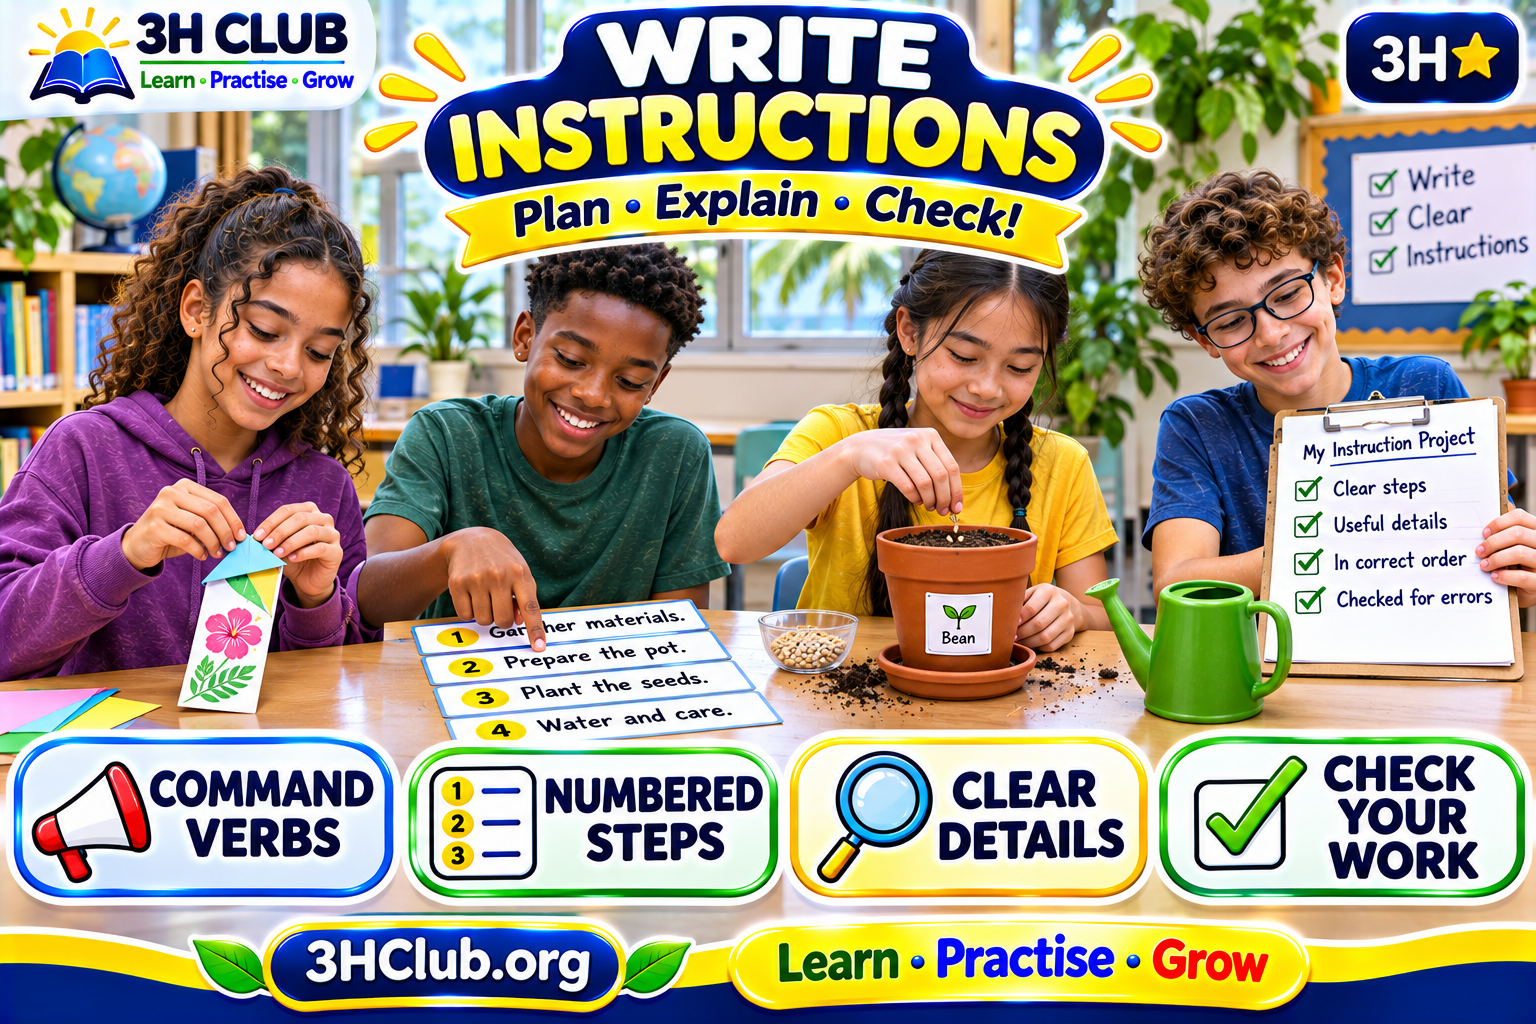
Write Instructions for Kids:
✍️ Learn to Explain Things Step by Step!
⭐⭐⭐ CHAMPIONS — Ages 10–11
📚 Subject: English – Instructional Writing, Grammar and Communication
🎯 Skills: Writing instructions, command verbs, sequencing, subjects and predicates, adverbs, precise vocabulary, editing and procedural writing.
🌟 Hello, Instruction Writer!
Imagine receiving these instructions:
Get some paper. Fold it. Do the other bits. Now you’re finished!
Would you know exactly what to do?
Probably not!
Now compare:
How to Make a Simple Paper Bookmark
- Place a rectangular piece of paper on a flat surface.
- Fold the paper in half lengthways.
- Press along the fold to make a sharp crease.
- Open the paper and decorate one side.
- Fold it again and slide it between the pages of your book.
These instructions are much easier to follow.
They use clear actions, sensible order and useful details.
Writing instructions is an important skill. You might use it to explain how to make something, organise an activity, follow a safety procedure or teach someone a new skill.
The challenge is to make your writing so clear that someone else can complete the task without having to guess.
Ready to become an instruction-writing expert?
Let’s begin!
🎯 What Will You Learn?
By the end of this lesson, you will be able to:
- Explain the purpose of instructional writing.
- Recognise the features of effective instructions.
- Write clear titles and equipment lists.
- Use command verbs and understand their implied subjects.
- Identify subjects and predicates in different sentence types.
- Organise steps in a logical sequence.
- Use sequencing words and precise adverbs.
- Include measurements, locations and safety information.
- Write instructions for different audiences.
- Test, revise and improve a set of instructions.
- Create your own complete instructional text.
⭐ Your mission: Write instructions that another person can follow accurately, safely and independently.
⭐ STAGE 1: INSTRUCTION EXPLORERS
Discover how instructions work
🔵 1. What Are Instructions?
Instructions are directions that explain how to complete a task.
They are a type of procedural writing, which means writing that explains a process.
You can find instructions in:
- Recipes.
- Craft activities.
- Science investigations.
- Game rules.
- Gardening guides.
- Equipment manuals.
- Classroom routines.
- Directions for using digital tools.
Good instructions answer three important questions:
What am I trying to do?
What will I need?
What should I do first, next and last?
✏️ Activity 1: Is It an Instruction?
Decide whether each sentence gives an instruction or provides information.
- Fold the paper in half.
- The paper is bright yellow.
- Place the seed in the soil.
- The plant has three leaves.
- Press the button once.
- The computer screen is large.
Explain how you recognized the instructions.
🟢 2. Discover the Parts of an Instruction Text
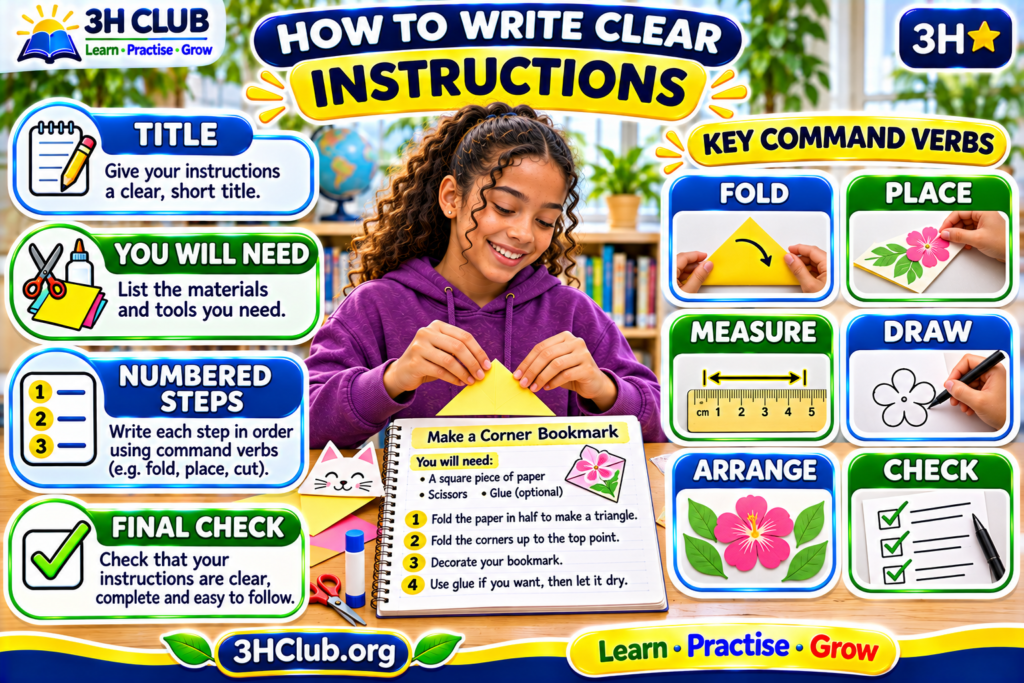
Many instructional texts have four useful parts.
1. Title
The title tells the reader what they will learn to do.
How to Make a Paper Bookmark
2. Materials or Equipment
List everything needed before beginning.
You will need:
- One rectangular sheet of paper.
- Coloured pencils.
- A ruler, if you want straight decorative lines.
3. Numbered Steps
Explain the actions in the correct order.
1. Place the paper on a flat surface.
2. Fold it in half lengthways.
3. Press firmly along the fold.
4. Final Check or Result
Explain how the reader knows the task is complete.
Your bookmark is ready when it folds neatly and fits between the pages of a book.
Not every instruction text needs the same headings. A simple two-step classroom direction might not need an equipment list, while a detailed science investigation may require one.
✏️ Activity 2: Label the Parts
Read:
How to Organise Your Study Desk
You will need: A storage box, a cloth and your school supplies.
- Remove the books and stationery from your desk.
- Wipe the empty surface with the cloth.
- Sort your supplies into groups.
- Return the items you use most often to easy-to-reach places.
- Put unused items into the storage box.
Final check: Your desk should be clean, organised and ready for studying.
Find:
- The title.
- The materials list.
- The first step.
- The last numbered step.
- The final check.
⭐ Remember
A reader should be able to see the purpose of the instructions before starting.
🟡 3. Use Command Verbs
Instructions often begin with command verbs.
A command verb tells someone to do something.
Examples include:
Fold, place, cut, measure, pour, draw, stir, check, attach, arrange, open, close and record.
Compare:
Unclear: You should do something with the paper.
Clear: Fold the paper in half.
The second sentence tells the reader exactly what action to perform.
Command Verbs in Action
| Command Verb | Instruction |
|---|---|
| Place | Place the notebook on the table. |
| Measure | Measure 10 centimetres along the edge. |
| Draw | Draw a straight line with a ruler. |
| Arrange | Arrange the cards in number order. |
| Check | Check that all the pieces fit together. |
✏️ Activity 3: Find the Command Verb
Underline the command verb.
- Open the book to page ten.
- Measure the paper carefully.
- Draw a circle in the centre.
- Arrange the objects from smallest to largest.
- Check your answers before continuing.
✏️ Activity 4: Choose the Best Command
Choose the most suitable verb.
- ______ the paper along the dotted line. (Fold / Taste)
- ______ the ruler beside the line. (Place / Sing)
- ______ the seeds with a small amount of water. (Water / Read)
- ______ the instructions before beginning. (Read / Bounce)
- ______ the results in your notebook. (Record / Jump)
🔵 4. Understand Subjects and Predicates in Instructions
A complete sentence usually contains a subject and a predicate.
The subject tells us who or what the sentence is about.
The predicate tells us what the subject does, is or experiences.
Statement Example
The careful student measured the paper.
Complete subject: The careful student
Complete predicate: measured the paper
But What About Commands?
Look at this instruction:
Measure the paper.
Who should measure the paper?
You!
In a command sentence, the subject is usually understood rather than written.
We can think of the sentence as:
(You) measure the paper.
- Understood subject: You
- Predicate: measure the paper
This is called an imperative sentence.
It is a complete sentence even though the word you does not appear.
Compare Statements and Commands
| Sentence | Subject | Predicate |
|---|---|---|
| Maya folds the paper. | Maya | folds the paper |
| Fold the paper. | You (understood) | fold the paper |
| Daniel checks the ruler. | Daniel | checks the ruler |
| Check the ruler. | You (understood) | check the ruler |
| The students arrange the cards. | The students | arrange the cards |
| Arrange the cards. | You (understood) | arrange the cards |
✏️ Activity 5: Subject and Predicate Detective
Identify the subject and predicate. Remember that commands can have an understood subject.
- The children planted the seeds.
- Place the pot near a suitable light source.
- Maya recorded the measurements.
- Check the labels carefully.
- The small plant grew two new leaves.
- Arrange the materials on the desk.
✏️ Activity 6: Turn Statements into Commands
Rewrite each statement as an instruction.
- The student opens the notebook.
- Maya draws a straight line.
- Daniel checks the answer.
- The children arrange the cards.
- The gardener waters the soil.
Example:
The student folds the paper.
Fold the paper.
⭐ Grammar Reminder
Commands have subjects too. The subject is usually the understood word you.
🟢 5. Put Instructions in the Correct Order
Instructions need a logical sequence.
Imagine trying to bake something before preparing the ingredients, or decorate a bookmark before deciding how to fold it.
The order matters.
Writers often use:
First, next, then, after that, before, while, finally.
Numbering also helps readers follow the sequence.
✏️ Activity 7: Put the Steps in Order
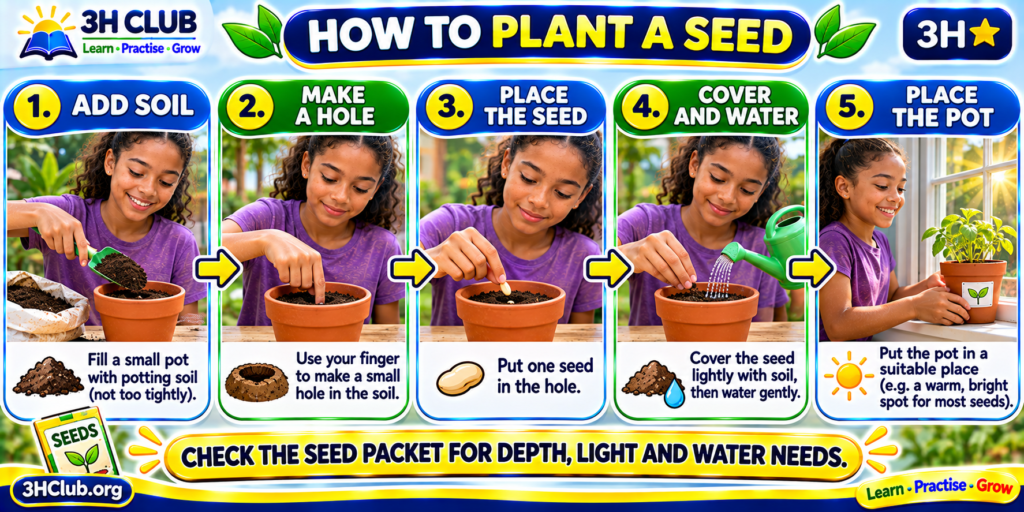
These instructions for planting a seed are mixed up.
A. Gently cover the seed with soil.
B. Put a little potting soil into a small plant pot.
C. Place the pot somewhere suitable for the plant.
D. Put the seed into a small hole in the soil.
E. Water the soil gently.
Write the letters in the most sensible order.
✏️ Activity 8: Add Sequencing Words
Complete the paragraph with suitable sequencing words.
________, gather your materials. ________, place the paper on the table. ________, fold it carefully. ________, check that the edges line up.
Possible words: First, Next, Then, Finally.
⭐ Writing Tip
You don’t need to begin every numbered step with then.
The numbers already show the order. Use sequencing words when they make the relationship between actions clearer.
⭐⭐ STAGE 2: INSTRUCTION DESIGNERS
Write precise, organised and useful directions
🟣 6. Be Specific: Tell the Reader Exactly What to Do
Compare:
Vague: Put the thing over there.
Precise: Place the blue card beside the ruler.
Compare:
Vague: Add some water.
Precise: Add two tablespoons of water to the container.
Precise instructions explain important details such as:
- Which object to use.
- Where to place it.
- How much to add.
- How long to wait.
- How to recognise the correct result.
✏️ Activity 9: Make It Precise
Improve these instructions.
- Put it there.
- Add some water.
- Draw a shape.
- Wait for a while.
- Make the line bigger.
You may invent reasonable details for the activity. In real instructions, measurements and timings must come from the actual task rather than guesses.
🟡 7. Use Adverbs and Helpful Phrases
An adverb can tell us how, when or where an action happens.
Examples:
Carefully, gently, slowly, firmly, immediately.
Compare:
Press the paper.
Press the paper firmly along the fold.
The word firmly tells the reader how to press.
However, an adverb is only helpful when it adds useful information.
✏️ Activity 10: Choose the Helpful Detail
Choose the most useful word.
- Hold the glass jar ______. (carefully / noisily)
- Stir the mixture ______ to avoid spilling. (gently / angrily)
- Press ______ along the fold to make a sharp crease. (firmly / sleepily)
- Move the fragile model ______. (carefully / loudly)
- Read the warning ______ before continuing. (fully / brightly)
⭐ Remember
A phrase such as until the edges meet can sometimes be more helpful than an adverb.
🔵 8. Include Safety Information When Needed
Some tasks need safety reminders.
Examples:
- Ask a trusted adult for help with sharp tools.
- Keep water away from electrical equipment.
- Wash your hands before handling food.
- Follow the manufacturer’s instructions when using equipment.
- Do not taste materials used in a science investigation unless an adult confirms they are safe to eat.
Example
Unclear: Cut the cardboard.
Safer and clearer: Ask a trusted adult to help you cut the cardboard along the marked line using a suitable tool.
Not every task requires a warning.
Include safety information when it genuinely helps prevent harm.
✏️ Activity 11: Safety Check
Which activities may need an extra safety reminder?
- Drawing a picture with coloured pencils.
- Cutting thick cardboard with a craft knife.
- Mixing ingredients for a snack.
- Sorting books on a low shelf.
- Using a hot oven.
Write a suitable reminder for two activities.
🟢 9. Write for Your Reader
Instructions should suit the person who will follow them.
For a beginner, explain unfamiliar terms.
For someone with experience, you may be able to use more specialised vocabulary.
Compare
For a beginner: Fold the paper so the two shorter edges meet.
For someone familiar with paper folding: Fold the rectangle in half lengthways.
Both may be useful, but the clearest choice depends on the task and the reader’s knowledge.
✏️ Activity 12: Explain It to a Beginner
Rewrite these instructions so someone new to the task can understand them.
- Align the components.
- Secure the attachment.
- Rotate the object clockwise.
- Verify the measurement.
Explain any word that might be unfamiliar.
🟣 10. Use Diagrams and Labels
Sometimes a picture explains a step more clearly than words alone.
A useful instructional diagram should:
- Show the correct object.
- Match the written step.
- Use accurate arrows.
- Include labels where necessary.
- Avoid unnecessary decoration.
- Show the result of an important action.
For example, a diagram of a paper fold should show the direction of the fold and the position of the edges.
✏️ Activity 13: Design a Helpful Diagram
Choose one step:
A. Fold a sheet of paper in half.
B. Place a seed into a small hole in soil.
C. Arrange four cards in number order.
Sketch a diagram that helps someone understand the step.
Add one accurate label or arrow.
🟡 11. Separate Complicated Actions
One instruction can become confusing if it contains too many actions.
Difficult to Follow
Get the paper and ruler and pencil and put the ruler down and measure the paper and draw a line and then fold it.
Improved
- Place the paper on a flat surface.
- Position the ruler along one edge.
- Measure the required distance.
- Mark the measurement with a pencil.
- Draw a straight line through the mark.
- Fold the paper along the line.
Each step has a clear purpose.
✏️ Activity 14: Break It into Steps
Rewrite this instruction as at least four numbered steps:
Get your notebook and pencil, open the notebook, write today’s date, add a heading and underline it.
🔵 12. Check That Your Instructions Are Complete
A missing step can make the whole task difficult.
Imagine reading:
- Put the seeds in the pot.
- Place the pot near a window.
What information is missing?
The reader may need to know about the soil, planting depth, watering and whether the location suits the seed type.
✏️ Activity 15: Find the Missing Steps
Read:
How to Make a Simple Name Card
- Write your name in large letters.
- Decorate the front.
- Display your name card.
What should happen before Step 1?
What could make the final step more specific?
Write an improved version of the instructions.
⭐⭐⭐ STAGE 3: INSTRUCTION MASTERS
Analyse, test and improve instructional writing
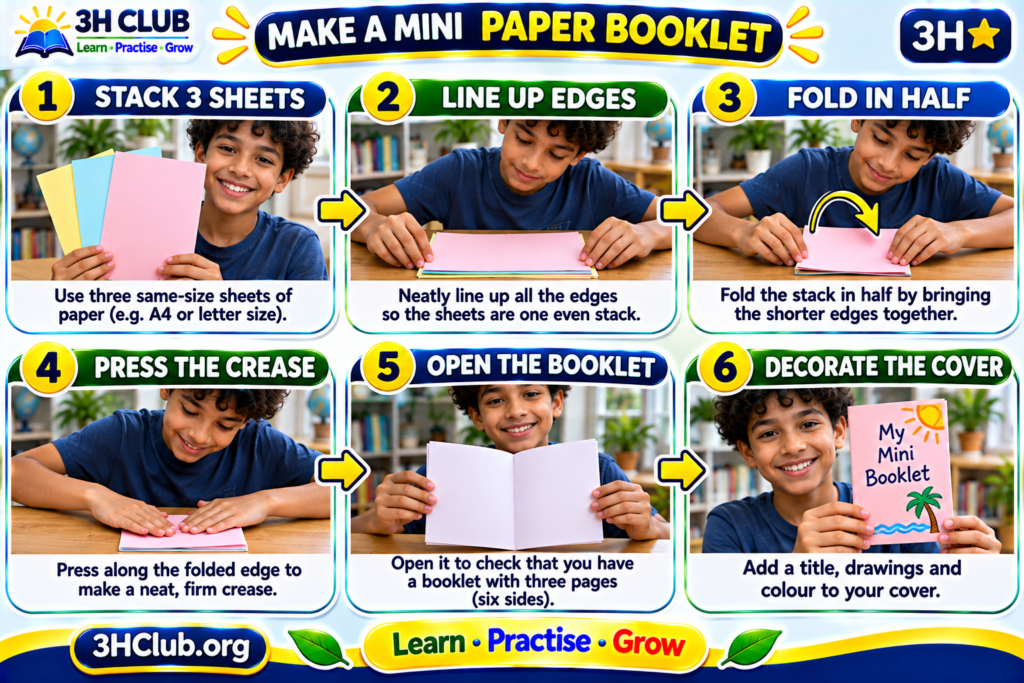
📖 13. Model Instructions: How to Make a Mini Paper Booklet
Let’s study a complete set of instructions.
📘 How to Make a Mini Paper Booklet
Purpose: Create a small folded booklet for notes, sketches or short stories.
You Will Need
- Three rectangular sheets of paper of the same size.
- A pencil.
- Coloured pencils.
- A ruler, if you want to draw straight lines.
Instructions
1. Prepare your paper. Place the three sheets on a clean, flat table.
2. Stack the sheets. Arrange them neatly so that their edges line up.
3. Fold the stack. Fold all three sheets in half, bringing the shorter edges together.
4. Make the crease. Press firmly along the folded edge.
5. Open the booklet slightly. Check that the sheets are still nested together and form a small booklet.
6. Decorate the cover. Write a title on the front and add a drawing.
7. Number the pages. Open the booklet and write page numbers in order, leaving the cover unnumbered if you prefer.
8. Add your content. Write a short story, record observations or create a collection of sketches.
Final Check
Your booklet should open and close easily, and its pages should remain in the correct order.
Note: This is an unfastened folded booklet. The pages may slide apart, so handle it carefully. You can ask an adult about suitable ways to bind it if you want a sturdier book.
🔍 Instruction Detective
| Feature | Example |
|---|---|
| Title | How to Make a Mini Paper Booklet |
| Purpose | Create a small booklet |
| Materials | Paper, pencil, coloured pencils |
| Command verbs | Place, arrange, fold, press, check, write |
| Numbered sequence | Steps 1–8 |
| Precise details | Three sheets, same size, shorter edges together |
| Final check | Pages in order; booklet opens and closes |
| Reader support | Explains how to make the crease |
✏️ Activity 16: Understand the Model
- What is the purpose of the instructions?
- How many sheets of paper are needed?
- Why should the sheets be the same size?
- What does Step 3 tell the reader to do?
- Why is pressing along the fold important?
- Which step asks the reader to check the sheets?
- Name three command verbs.
- How can the reader check that the booklet is complete?
- Why is it useful to mention that the pages may slide apart?
- What could make the booklet stronger?
✏️ Activity 17: Find Subjects and Predicates
Identify the subject and predicate in each sentence.
- The three sheets lie on the table.
- Arrange the sheets neatly.
- The folded pages form a small booklet.
- Write a title on the cover.
- The finished booklet opens easily.
Remember the understood subject in command sentences.
✏️ Activity 18: Improve the Model
Imagine a younger learner finds Step 3 confusing:
Fold all three sheets in half, bringing the shorter edges together.
Rewrite this step in two simpler sentences without changing the intended fold.
Then explain what diagram you would add.
✍️ 14. Plan Your Own Instructions
Before you write, complete this planning guide.
📝 My Instruction Writer Planner
Task title: __________
Who will follow the instructions? __________
What should they achieve? __________
Materials or equipment: __________
Important safety reminders: __________
What must happen first? __________
What happens next? __________
What must happen last? __________
Which steps need extra details? __________
Would a diagram help? __________
How will the reader know the task is complete? __________
✏️ Activity 19: Plan a Real Task
Choose one:
A. How to organise a school bag.
B. How to create a reading timetable.
C. How to make a paper bookmark.
D. How to care for a classroom plant.
E. How to set up a simple board game.
Complete the planner before writing.
🟢 15. Write Your First Draft
Use your plan to write a complete instructional text.
Include:
- A clear title.
- A short purpose statement if needed.
- A materials list.
- At least six numbered steps.
- Precise command verbs.
- Any necessary safety reminders.
- A final check.
✏️ Activity 20: Write and Test Your Instructions
Ask a classmate, family member or another suitable reader to follow your instructions for a safe, simple task.
Observe without immediately explaining every step.
Then ask:
- Which steps were easy?
- Which steps were confusing?
- Was any information missing?
- Did the order make sense?
- Did the finished result match the goal?
Use the feedback to improve your writing.
⭐ Important
Test only safe, age-appropriate tasks. Ask an adult for guidance when a task involves sharp tools, heat, electricity or other hazards.
🔍 16. Edit Instructions Like an Expert
Writers revise instructions to make them clearer.
Weak Version
Get the stuff. Put it together. Make it neat. Then finish.
Improved Version
How to Organise a Pencil Case
- Empty your pencil case onto a clean table.
- Separate pencils, pens, erasers and other supplies into groups.
- Check each item and set aside anything broken or no longer useful.
- Place the items you use most often into the pencil case first.
- Close the case and check that it fastens easily.
The improved version tells the reader exactly what to do.
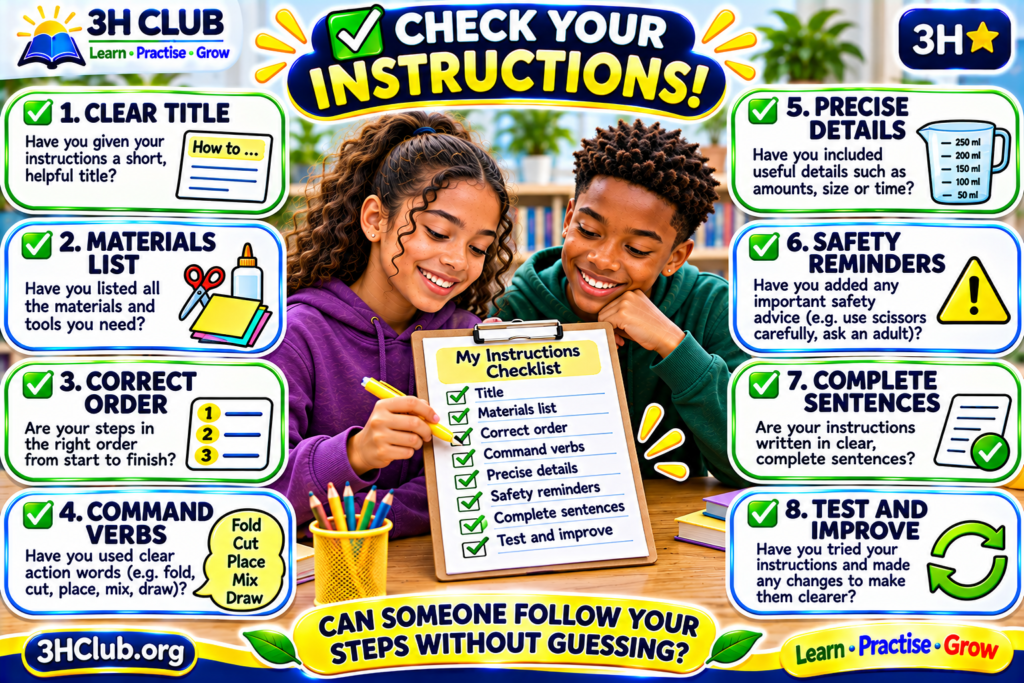
Editing Checklist
Ask yourself:
- Is my title clear?
- Have I listed the necessary materials?
- Are the steps in the correct order?
- Does each step begin with a clear action?
- Have I included useful measurements or locations?
- Are any important steps missing?
- Are my sentences complete and easy to understand?
- Have I included relevant safety reminders?
- Can the reader recognise the finished result?
🎲 17. Five Fun Instruction Writing Games
🎯 Game 1: Command Verb Hunt
Find ten command verbs in a recipe, craft guide or set of game rules.
Write them in your notebook.
Then use five in original instruction sentences.
🔀 Game 2: Mixed-Up Steps
Write five instructions for a simple task on separate cards.
Shuffle the cards.
Ask someone to arrange them in the correct order.
🕵️ Game 3: Missing-Step Detective
Write a short set of instructions, but deliberately remove one important step.
Ask a partner to identify what’s missing.
Then restore the step.
🎭 Game 4: Explain It Without Pointing
Describe how to arrange four objects on a desk.
You may use only spoken or written instructions.
Your partner must follow them without seeing your example.
This game helps you practise precise location words.
🧩 Game 5: Instructions Editor
Write three deliberately vague instructions.
Exchange them with a partner.
Rewrite them using specific verbs, measurements or locations.
🏆 18. Final Instruction Champions Challenge
Part A: Instruction Knowledge
Choose the correct answer.
1. What is the main purpose of instructions?
A. To describe a fictional character.
B. To explain how to complete a task.
C. To entertain readers with a mystery.
2. Which sentence is a command?
A. The paper is blue.
B. Maya folded the paper.
C. Fold the paper carefully.
3. Why are numbered steps useful?
A. They show the order of actions.
B. They make every instruction longer.
C. They replace all useful details.
Part B: Find the Command Verbs
Identify the command verb.
- Place the ruler on the table.
- Measure the length carefully.
- Fold the paper along the line.
- Check that the corners meet.
- Record the result.
Part C: Subject and Predicate
Identify the subject and predicate.
- The student measures the paper.
- Draw a straight line.
- The seeds grow in the soil.
- Check the equipment.
- The finished model stands upright.
Part D: Put the Steps in Order
Arrange these instructions for preparing a study space.
A. Put your books and supplies within easy reach.
B. Remove unnecessary objects from the desk.
C. Check that you have everything needed.
D. Wipe the desk surface if necessary.
Part E: Improve the Instruction
Rewrite:
Put the thing in the place and do it carefully.
Invent a simple, realistic task and write a precise instruction for it.
Part F: Find the Missing Detail
How to Draw a Rectangle
- Place your ruler on the paper.
- Draw a line.
- Draw three more lines.
- Finish.
Rewrite these steps so a beginner knows how to draw a rectangle with four straight sides and four right angles.
⭐ Final Creative Writing Mission
Write a complete guide titled:
How to Teach Someone a Useful Skill
Choose a skill you know well.
It could be organising a notebook, making a bookmark, creating a study plan or preparing a simple game.
Your guide must include:
- A clear title.
- A materials list, if needed.
- Eight to ten numbered steps.
- Accurate command verbs.
- At least three precise details.
- A suitable safety reminder, if necessary.
- A final check.
- One helpful diagram or labelled sketch, if appropriate.
Then test your instructions and revise them.
✅ 19. Check Your Answers!
Activity 1: Is It an Instruction?
- Instruction.
- Information.
- Instruction.
- Information.
- Instruction.
- Information.
Instructions tell the reader to perform an action.
Activity 2: Label the Parts
- How to Organise Your Study Desk.
- Storage box, cloth and school supplies.
- Remove the books and stationery from your desk.
- Put unused items into the storage box.
- The desk should be clean, organised and ready for studying.
Activity 3: Command Verbs
- Open.
- Measure.
- Draw.
- Arrange.
- Check.
Activity 4: Choose the Command
- Fold.
- Place.
- Water.
- Read.
- Record.
Activity 5: Subject and Predicate
| Subject | Predicate |
|---|---|
| The children | planted the seeds |
| You (understood) | place the pot near a suitable light source |
| Maya | recorded the measurements |
| You (understood) | check the labels carefully |
| The small plant | grew two new leaves |
| You (understood) | arrange the materials on the desk |
Activity 6: Turn Statements into Commands
- Open the notebook.
- Draw a straight line.
- Check the answer.
- Arrange the cards.
- Water the soil.
Activity 7: Correct Order
B → D → A → E → C
Activity 8: Sequencing Words
First, Next, Then, Finally.
Other sensible sequences may also work.
Activity 9: Make It Precise
Possible answers:
- Place the blue card beside the ruler.
- Add 50 millilitres of water to the measuring cup.
- Draw a circle with a diameter of 5 centimetres.
- Wait for two minutes before checking the result.
- Extend the line by 3 centimetres.
These measurements are illustrative; real instructions must use measurements suitable for the task.
Activity 10: Helpful Details
- Carefully.
- Gently.
- Firmly.
- Carefully.
- Fully.
Activity 11: Safety Check
Activities 2, 3 and 5 may require safety reminders, depending on the tools and ingredients used.
Examples:
- Ask an adult to handle a craft knife.
- Wash your hands before preparing food.
- Only use a hot oven with appropriate adult supervision.
Activity 12: Explain It to a Beginner
Possible answers:
- Place the pieces so their edges line up.
- Fasten the piece securely in the correct position.
- Turn the object to the right, in the direction clock hands normally move.
- Check the measurement to make sure it is correct.
Activity 13: Helpful Diagram
Answers will vary. Check that the picture, arrow and label match the written action.
Activity 14: Break It into Steps
- Place your notebook and pencil on the desk.
- Open the notebook to a blank page.
- Write today’s date at the top.
- Write the lesson heading beneath the date.
- Use a ruler to underline the heading.
Activity 15: Missing Steps
Possible improved version:
- Place a rectangular piece of card on a flat surface.
- Fold the card in half so it can stand.
- Write your name in large letters on the front.
- Decorate the front without covering your name.
- Stand the folded card on your desk with your name facing outwards.
Activity 16: Model Comprehension
- Make a small paper booklet.
- Three sheets.
- So their edges line up neatly.
- Fold the stack in half with the shorter edges together.
- To create a clear crease.
- Step 5.
- Possible answers: Place, arrange, fold, press, check, write.
- Check that it opens and closes and that pages are in order.
- So the reader understands the limitations of the unfastened booklet.
- An appropriate binding method, with adult guidance where needed.
Activity 17: Subjects and Predicates
| Subject | Predicate |
|---|---|
| The three sheets | lie on the table |
| You (understood) | arrange the sheets neatly |
| The folded pages | form a small booklet |
| You (understood) | write a title on the cover |
| The finished booklet | opens easily |
Activity 18: Simplify the Step
Possible answer:
Hold the three sheets together with their edges lined up. Bring the two shorter edges together to fold the stack in half.
A helpful diagram would show the direction of the fold with an arrow.
Activity 19: Plan a Real Task
Answers will vary. Check that the task has a clear goal, appropriate materials and a sensible sequence.
Activity 20: Write and Test
Answers will vary. Successful revisions should address the reader’s actual difficulties.
Final Challenge: Part A
- B.
- C.
- A.
Final Challenge: Part B
- Place.
- Measure.
- Fold.
- Check.
- Record.
Final Challenge: Part C
| Subject | Predicate |
|---|---|
| The student | measures the paper |
| You (understood) | draw a straight line |
| The seeds | grow in the soil |
| You (understood) | check the equipment |
| The finished model | stands upright |
Final Challenge: Part D
B → D → A → C
Final Challenge: Part E
Possible answer:
Place the red notebook on the top shelf and make sure it lies flat.
Final Challenge: Part F
Possible answer:
- Place a sheet of paper on a flat surface.
- Use a ruler to draw a horizontal line 8 centimetres long.
- Use a set square to draw a 5-centimetre line downwards from each end, making a right angle at each corner.
- Join the lower ends with another straight 8-centimetre line.
- Check that the opposite sides are equal and all four corners are right angles.
⭐ Final Creative Writing Mission: Example
How to Organise a Reading Notebook
You will need:
- A notebook.
- A pencil.
- A ruler.
- Coloured pencils.
Instructions
- Place your notebook on a clean desk.
- Open the notebook to the first blank page.
- Write the heading My Reading Journal at the top.
- Use a ruler to draw a line beneath the heading.
- Write today’s date below the line.
- Add the title and author of the book you are reading.
- Write three sentences summarising what you have read.
- Record one new word and explain its meaning.
- Write one question or prediction about the story.
- Decorate the page with a small illustration related to the book.
Final check: Make sure your notebook includes the date, book details, summary, vocabulary and prediction.
🎉 Excellent work, Instruction Champion!
You have learnt how to write, organise, test and improve instructions so that others can follow them.
🌈 20. What Have You Learnt?
✍️ Instructions Explain a Process
They tell someone how to complete a task.
🔢 Order Matters
Numbered steps help readers follow a logical sequence.
🎯 Command Verbs Make Actions Clear
Words such as fold, measure, place and check tell readers what to do.
🧩 Commands Have Understood Subjects
In Fold the paper, the subject is you, even though it is not written.
📏 Precise Details Prevent Confusion
Measurements, positions, quantities and timings can help readers complete a task accurately.
🔍 Testing Makes Instructions Better
Ask someone to follow your instructions and improve any confusing steps.
⭐ The Instruction Writing Formula
CLEAR TITLE + MATERIALS + LOGICAL STEPS + COMMAND VERBS + PRECISE DETAILS + FINAL CHECK = EFFECTIVE INSTRUCTIONS
This is a useful planning guide, not a fixed rule for every type of instruction.
🌟 Keep Learning with 3HClub!
You now know how to explain a process clearly and confidently.
Remember:
Think about your reader.
Plan before writing.
Use direct command verbs.
Put actions in the correct order.
Include the details that matter.
Check for missing steps.
And revise your work after testing it.
📚 Your Next Learning Adventures
- Write a Sentence for Kids
- Making a Sentence More Interesting
- How to Write a Paragraph for Kids
- Subject and Predicate
- Verbs for Kids
- Adverbs for Kids
- Conjunctions for Kids
- Basic Punctuation
- Cause and Effect
- Sequence of Events
⭐ Your Instruction Writer Promise
I can explain a task clearly.
I can use command verbs.
I can recognise understood subjects.
I can organise numbered steps.
I can include useful details.
I can write appropriate safety reminders.
I can test and improve my instructions.
Keep planning, explaining and learning!
3H CLUB — Learn • Practise • Grow